

By Bob Hall
During the Vietnam War, major units such as infantry battalions regularly compiled ‘lessons learned’ documents critically assessing their operations, noting problems that had arisen and suggesting solutions. These ‘lessons’ documents were widely distributed throughout the Army and provide insights into the tactical successes and failures of the campaign. In April 1971, Lieutenant Colonel Peter Scott, CO 3RAR wrote a thoughtful critique of an incident on 20 March 1971 describing what happened and the lessons he derived from what went right and what went wrong. As is often the case, the best lessons are derived from those incidents that go wrong. This incident was to reveal how seemingly insignificant issues like how best to carry smoke grenades, could mean the difference between success or failure.[i]
On 17 March 1971, after only eighteen days on operations, 3RAR encountered elements of D445 Local Force Battalion four kilometres north west of Xuyen Moc. Lieutenant Colonel Scott wrote that:
In this engagement 9 Platoon C Company, 3RAR met four enemy, killed one, wounded one and captured two weapons and many important documents. These documents were found on the KIA who was identified as a platoon commander in C3 [3 Company, D445]. As a result of this action, C Company was reinforced with a section of Armoured Personnel Carriers and the Anti-tank Platoon and were given the task of searching the area north of Xuyen Moc.
On 20 March a half-platoon patrol of 8 Platoon C Company was patrolling in single file along a track made some time earlier by APCs when they heard the sounds of chopping, digging and a dog barking – sounds that should have alerted them to the possibility that an enemy bunker system was nearby. The patrol commander ordered his men to drop their field packs and shake out into assault formation. Without further reconnaissance and without seeing the enemy, he ordered his men to fire on the unseen source of the noises with M79 and rifle projected grenades. But this merely served to sacrifice surprise. The patrol then swept forward in assault formation. The enemy, alerted by the grenades, opened fire on the advancing patrol with AK47s, RPG2s and a satchel charge fatally wounding the patrol commander and wounding two other men.[ii] The 16-man patrol had quickly lost three men in the opening exchanges of fire and its ability to produce fire fell accordingly. The patrol found itself pinned down on the edge of a newly constructed bunker system facing an unknown number of enemy.
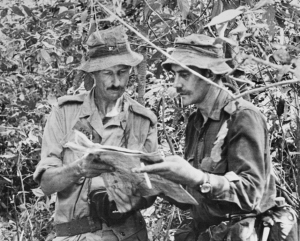
Lieutenant Colonel Peter Scott briefing Major Peter Tilley, OC C Company on operations.
Helicopter gunships were called in and the patrol was forced to partially withdraw leaving the patrol commander and one of the wounded where they lay. It was established later that the patrol commander, Second Lieutenant David Paterson, had died immediately as a result of his wounds but at the time the patrol withdrew, his fate was unknown.
The patrol was then commanded by Corporal Peter Manoel, but he faced a major problem when the patrol used its one and only smoke grenade in an attempt to mark their position for the helicopter gunships. Their field packs along with many of their smoke grenades had been dropped at the assault start line now some distance to their rear. Accurate enemy fire had the patrol pinned down. No one could get back to the field packs to bring forward more smoke grenades. Efforts to resupply the patrol with smoke grenades by the gunships and the Commanding Officer in the Direct Support Sioux helicopter failed repeatedly because of very thick vegetation, difficulty in pinpointing the exact location of the patrol and enemy fire directed at the helicopters. The enemy engaged the 9 Squadron RAAF gunship as it attempted to drop smoke, mortally wounding the co-pilot, Pilot Officer Ronald Betts. The gunship received 25 hits and was forced to limp back to FSB Beth and land. Without coloured smoke marking their position, the half-platoon patrol could not be effectively supported by the gunships or by artillery. They were effectively on their own until other patrols could arrive.
The enemy were well dug in and firing from their bunkers. Their strength was estimated at about 20 – about the strength of a company in D445. They outnumbered the 13 Australians and also had the advantage of overhead protection, fire lanes, mutual support between bunkers and depth. Bunker systems occupied by more than about six enemy presented significant tactical problems even for rifle companies or full platoons. Sometimes they included crawl trenches, tunnels and spider holes as well as defensive claymore mines and unexploded shells and bombs rigged for command detonation. Analysis of more than 200 bunker system attacks by elements of 1ATF shows that when enemy bunker systems were occupied by six enemy or more the exchange ratio was 1:1 – for every enemy soldier killed or wounded by the Australians, an Australian was also killed or wounded. The 16-man half-platoon patrol of C Company had already lost three casualties and was in a dire predicament.
The rest of C Company was well spread out at the time of the contact. It became obvious that speed was essential if nearby elements were going to relieve the patrol. The other half-platoon patrol of 8 Platoon began moving to support the patrol from about 1.5 kilometres to its north. Also moving to give support were 7 Platoon located 1 kilometre to the south and Company HQ and 9 Platoon, 2 kilometres to the south-west. But foot patrolling in heavy jungle and with enemy and other friendly patrols known to be in the area, had to be cautious and therefore slow. A friendly fire clash or another contact with the enemy would have added to an already bad day. The Assault Pioneer Platoon mounted in an APC section scrambled from FSB Beth about 5 kilometres west of Xuyen Moc and a troop of tanks and a section of mortars mounted in Armoured Mortar Carriers also deployed to support the patrol.[iii]
Meanwhile, the patrol remained pinned down while 9 Squadron RAAF helicopters circled overhead without any way of identifying the patrol’s location. To have fired into the area with rockets and miniguns without knowing the location of the patrol could have resulted in heavy friendly casualties. The difficulty of providing support was further complicated by the fact that the platoon commander and one other wounded soldier were somewhere forward of the patrol and it was not known whether they were alive or dead.
Lieutenant Colonel Scott, in the direct support Sioux helicopter, guided the tanks towards the contact site. The APCs and other elements of C Company were moving towards the contact on different axes. This could create the potential for a friendly fire clash as the various patrols drew closer together. Luckily, this risk was averted and the various patrols concentrated at the contact site without incident. But the approach to the contact site had taken some time and the enemy, meanwhile, had escaped without apparent loss.
Lieutenant Colonel Scott set out the following lessons from the incident:
- In future, patrols were never to operate more than 250 metres from a firm base.
- Platoons were never to be separated by more than 500 metres.
- Tracks were not to be used by patrols except in situations where speedy redeployment to a new task was a requirement.
- Patrols were not to fire on movement or noise without first conducting reconnaissance.
- Smoke grenades must always be carried on patrol order, not in field packs.
- Tanks and APCs moving through thick jungle need to be guided by an airborne observer.
- Whenever the CO was airborne in the direct support helicopter, he was to take a sandbag full of smoke grenades.
Scott made a final observation; that there is a risk that a commanding officer, airborne over a contact in the direct support helicopter, may become too involved in the platoon and company-level battle and that command and control of the battalion may suffer as a result. Scott acknowledged this risk but noted that on this occasion, with the company commander moving towards the patrol in contact, his role in commanding the patrol’s battle was necessary.
Notes:
[i] AWM115, item 56, AHQ, Lessons Learned by 3RAR in the 1971 Vietnam tour. LTCOL F.P. Scott, CO 3RAR, report, ‘Battalion Operations – Mar/Apr 1971’ dated 25 April 1971.
[ii] Colonel F. Peter Scott, DSO, Command in Vietnam: Reflections of a Commanding Officer, Slouch Hat Publications, McCrae, 2007, p.65.
[iii] Colonel F. Peter Scott, DSO, Command in Vietnam: Reflections of a Commanding Officer, Slouch Hat Publications, McCrae, 2007, p. 65.