
By Ian F. Ahearn
Background – Operation Toan Thang
Operation Toan Thang (Complete Victory) was launched on 8 April 1968. It was a combined operation deploying 70,000 US, Vietnamese, Australian, New Zealand and Thai troops with the initial aim of destroying enemy forces in the III Corps area.
Australian participation in the combined operation commenced on 21 April 1968 with the deployment of 1st Australian Task Force (1 ATF). The infantry component of the Australian Task Force was the 3rd Battalion and 2nd Battalion Royal Australian Regiment (RAR). The two infantry battalions were supported by their two affiliated gun batteries from 12 Fd Regt, a squadron of armoured personnel carriers from 3 Cavalry Regiment (A Squadron), 1 Field Squadron Royal Australian Engineers and 161 Independent Reconnaissance Flight Army Aviation. While its normal area of operations was Phuoc Tuy Province, the Australian Task Force was deployed into Long Khanh Province, some 16 kilometres east of the large US base at Long Binh.
Initially, the aim of 1 ATF was to delay and disrupt enemy infiltration into Long Khanh, thus destabilising and frustrating any enemy preparations to attack vital targets located within the province or its neighbouring provinces. This aim was to be more sharply focused as the operation developed and possible enemy movements became clearer.
On 3 May 1968, nearly four weeks after the Australian deployment on the operation, 3rd Battalion (3RAR) was relieved by 1st Battalion Royal Australian Regiment (1 RAR). On 5 May, the two Australian battalions – 1 RAR and 2 RAR – were redeployed further north into Bien Hoa Province. The redeployment enhanced the Australian force’s ability to provide protection for the large allied military complex of Bien Hoa/Long Binh but it also put the Australians into an area within the eastern approaches to Saigon.
The North Vietnamese Army struck Saigon on 5 May. It was a daring attack, but the enemy failed to achieve the success of its earlier Tet Offensive in February of the same year. By 7 May the enemy attack on Saigon had been successfully repulsed and the Americans believed that the enemy was withdrawing from the area.
The enemy withdrawal from Saigon was a significant development for the Australian force, which, to this stage, had seen little action in its area of operations to the north-east of the Bien Hoa/Long Binh complex. But, on 10 May, events began to unfold that would place the Australians in the thick of the most prolonged and intense fighting experienced by an Australian force in the Vietnam War.
This account of the battle at Fire Support Patrol Base Coral on 12-13 May 1968 is written by a participant in the battle; not a commander located in a static headquarters at some distance from the events; not a staff officer involved in drafting plans and orders; not a logistics officer concerned about supply or repair issues; but a junior combat officer, who, with the other officers and men on the ground, was directly engaged with the enemy face-to-face from the start to the finish. The author’s actual position is emphasized in this instance because it provides an understanding of his perspective of the battle and, consequently, his account of what transpired.
Individual perspectives can influence accounts of what happened. This presents a historian writing some decades after the event with some difficulties in producing a credible narrative. Indeed, some question the value of history at all. In this vein, it has been said that God cannot change the past, that historians alone can do that. Perhaps some readers will judge this to be a cynical observation, but it resonates with this author in relation to the subject of this article.
The second of the three volume Australian official history of the Australian Army’s involvement in the Vietnam War, On the Offensive – The Australian Army in Vietnam 1967-1968, by Ian McNeil and Ashley Ekins, presents an account of the battle on 12-13 May 1968 at Coral. Unfortunately, it is a flawed account. As already noted, it could be expected that individual perspectives would have some influence on the work of McNeill and Ekins, but the flaws in their official history go much further. The official history is deeply distorted by misunderstanding and misinterpretation of source material. What is particularly frustrating for this author is that the advice of a number of people, who actually participated in the battle at Coral, was ignored. The author is of the firm belief that these flaws were avoidable and should not have distorted the official history of Australia’s involvement in what was for scale, intensity and duration the most significant battle of the war. It was a battle that demanded greater diligence from the official historians.
This account of the first attack on Fire Support Patrol Base (FSPB) Coral has been written to record the experiences of the author and his colleagues in the ensuing battle and, importantly, to correct a number of the flaws existing in the official account by McNeil and Ekins. To begin at a basic level, the official historians chose to use the acronym FSB instead of FSPB. This is not a trivial issue of nomenclature. The term FSB was used by the American Army and was based on its established practice of using firepower alone to dominate the surrounding area. Yet, it is well known that the Australian Army, since World War II, operated differently at the tactical level by concentrating on vigorous and extensive patrolling to dominate and control an area in concert with the use of firepower; hence the use of the term FSPB. Significantly, the different operational methods used by American and Australian forces were an enduring feature of the Vietnam War. Perhaps McNeil and Ekins were unaware of this fundamental, but important, operational reality of the Army that they were writing about. But ignorance is no excuse in this case. The acronym FSPB was used in all of the relevant primary source documents relating to the operation of Australian forces at the time of the battle at Coral. But, for some unknown reason, McNeil and Ekins used an American term instead.
The following account uses the same major headings as the Official History to enable easier reference to events.
Occupation of FSPB Coral
Operation Toan Thang had been underway for some four weeks when, according to the Official History, the 1st Australian Task Force (1 ATF) Commander, Brigadier Hughes, attended an Orders Group at the American II Field Force Vietnam Headquarters at Long Binh on 10 May 1968. According to the Official History, at that Orders Group Hughes was told “the [Australian] task force was to move again, further into Bien Hoa”.[1]
The mission assigned to 1 ATF was to “occupy blocking positions within AO Surfers to interdict enemy withdrawal routes from the South and SW.” Area of Operations (AO) Surfers, as the Australian area was called, was to be divided into subordinate areas of operations; AO Bondi allocated to 1 RAR and AO Manly allocated to 3 RAR which replaced 2 RAR on the same day as the orders group.
12 Field Regiment Royal Australian Artillery (12 Fd Regt RAA) was to be centralised as a combined force in Fire Support Patrol Base (FSPB) Coral with the Australian 102 Field Battery, the New Zealand 161 Field Battery and the US A Battery, 2/35 Battalion. The centralisation of the three artillery batteries into a Regimental Gun Position allowed both Australian infantry battalions to be supported by all the fire units available, although the normal battery/battalion affiliations remained with 102 Battery in Direct Support of 1 RAR and 161 Battery in Direct Support of 3 RAR. This meant that the respective Battery Commanders and Forward Observers were embedded within the Headquarters (HQ) of their respective infantry battalions; the American A Battery was placed in General Support of both battalions but all batteries could be used to provide fire for any of the deployed infantry.
The deployment to FSPB Coral was to commence with the fly-in of B Company 3 RAR at 0700 hours. B Company’s role was to secure the Landing Zone (LZ), thus establishing a safe area for other elements of the force to be landed. B Company would be followed into the LZ by the reconnaissance parties from 12 Fd Regt, 102 Battery, 161 Battery and 1 RAR at 0705 hours. The role of these reconnaissance parties was to select the battery areas and lay out each battery gun position. The remaining three companies of 3 RAR were to be inserted at 0745 hours. The four I RAR companies were to be landed in three elements; one at 0945 hours, one at 1155 hours and the last at 1246 hours. 161 Battery guns were to arrive at 1000 hours followed by 102 Battery guns at 1230 hours and the 1 RAR Mortars at 1245 hours.
Altogether four LZs were specified in the written 1 ATF Fragmentary Order No. 6 to Operation Order 19/68 but the exact location of only one LZ, designated as K Pad, was given a specific map grid reference. This was the pad that B Company 3 RAR was to secure at the start of the landing operation. Five minutes after the B Company insertion, the Artillery and 1 RAR reconnaissance parties were to use the same LZ.
161 Battery main body was to use Z Pad, 102 Battery was to use X Pad and 1 RAR was to use H Pad. No map location was given for any of these LZs. This was a departure from established practice for a major operational deployment. Failure to designate grid references for Z, X and H LZs can hardly have been an oversight and it can only be surmised that separate instructions were given to somebody to identify the locations of the LZs and pass the information on to the units and sub units earmarked to use them. Whatever the reason for the failure to specify the exact locations of the LZs in the original 1 ATF Fragmentary Order, no subsequent co-ordinating instructions were issued.
There was another factor which had the potential to upset the smooth execution of the deployment of the force. The 1 ATF written orders for the operation were never sighted by the subordinate units. This meant that the operation was to proceed on the basis of verbal orders alone. As Commanding Officer 1 RAR, Lieutenant Colonel Phillip Bennett recalled:
On 10 May, Comd 1 ATF gave verbal orders for an air assault landing at FSPB Coral. Later that afternoon this was amended by HQ 1ATF to being an airlanding. [2]
According to Robert Lowry in his recently published biography of Bennett, both Shelton, the Commanding Officer of 3 RAR, and Bennett “deny that that they received the written orders either at or after the orders group. They also denied that Brigadier Hughes’ verbal orders, given late on the 10 May, at Bearcat, a US Base near the town of Long Thanh in Bien Hoa Province, conveyed anything [about the enemy] other than that there would be elements of units withdrawing to base areas north of Saigon”.[3] The assessment of the enemy’s size and sense of well-being would later prove to be incorrect, but, in the meantime, it was misleading information that influenced the way in which the infantry forces, in particular, would be deployed.
The Artillery Fragmentary Order (Frag O), transmitted by radio, was received on the night of the 11 May 1968. It emphasised the 1 ATF mission and summarised the enemy as withdrawing in small groups with low morale away from its unsuccessful fighting in the Saigon area. It contained one map reference, XT925284, and made no mention of K Pad let alone any other LZs. The Frag O also contained the vital technical data for the artillery (such as centre of arc, ammunition holding, timings for movement of reconnaissance parties and guns and time to be ready to provide fire). The order included instructions for the movement of regimental and battery reconnaissance parties and its whole tenor indicated a regimental deployment. The order also indicated that the Regimental Second-in-Command (2IC), Major Brian Murtagh, would be the FSPB local defence commander. The movement of the American A Battery, which was equipped with 155mm self-propelled Howitzers too large for airlift, would be deployed by road on 13 May 1968. Therefore, it would be one day before FSPB Coral had a full regimental complement of firepower – 18 guns in all.
Significantly, the radio orders received by the artillery revealed the inconsistencies in the 1 ATF written Frag O. The latter directed each infantry battalion “to establish” its affiliated direct support battery in Coral. Such a direction would have been meaningless to the artillery if they had received it, but no such direction was received in the radio orders. In accordance with orthodox military practice, 102 and 161 Batteries expected a regimental deployment complete with the Regimental 2IC allocating the battery areas. Then battery Gun Position Officers (GPO) would lay out the sites for the battery’s individual guns within the area that they had been allocated by the Regimental 2IC. This expectation was met when the 1 ATF orders included instructions for a Regimental reconnaissance party. The only intelligence provided in the written orders on the enemy echoed the original verbal orders received by Bennett and Shelton: the enemy was withdrawing from the Saigon area, in small groups, with low morale.
The Official History makes much of the passage of the intelligence on the expected enemy threat. In simple terms it is “much ado about nothing” since both CO 3RAR and CO 1RAR have strenuously denied that the intelligence about formed bodies of the enemy reinforcing Saigon was passed in the orders. Likewise, no sub-unit commander or subordinate officers received any information that the enemy was present in strength and spoiling for a fight. The written 1 ATF orders confirm this. The mission given to the task force and the subsequent deployment of the companies in dispersed ambush positions – a dangerous move for an enemy operating in any strength – point to a breakdown in the passage of intelligence to the battalions and the Gunner regiment. According to the Official History, the 1ATF Intelligence Officer Major Cameron stated that:
Once we arrived at Coral we realised that we had stirred up a hornets’ nest, but that is exactly why HQ II FFV sent us there in the first place.[4]
Perhaps the passage of time has dulled Cameron’s memory, but his statement reproduced in the Official History is clearly inconsistent with the 1 ATF verbal orders, the 1 ATF written orders and the recollections of the senior infantry commanders as well as those of the artillery officers involved. If Cameron’s statement in the Official History is correct then it suggests that HQ 1 ATF was in possession of vital intelligence on the enemy that was not passed on to the combat force that needed it. The critical information about the enemy would have prepared the combat troops for what they were about to receive. Failure to pass along the enemy capabilities in full would cost lives. The Official History failed to analyse the question of enemy intelligence in relation to the tactical stance adopted by the Australian force. It is hard to avoid the conclusion that the authors simply did not understand the vital military implications of the intelligence issue. As a result, one of the key lessons to be learnt from the deployment at FSPB Coral is not addressed in the Official History.
Delays and Disruption
The initial deployment did not go smoothly. It set the scene for a day where there was considerable confusion, with important decisions being made on the spot as events unfolded.
The first disruption reported in the deployment, according to the Official History, was made by Lieutenant Colonel Shelton, CO 3 RAR, when he discovered that the US Army was in contact with the enemy in the vicinity of Coral. According to the History, Shelton, after radio discussions with the Commander 1 ATF, began to make rapid changes to the plan. The History does not say what those rapid changes were and, at the time, no information was passed to the Gunner elements of the deploying force about any changes, rapid or otherwise.
According to the Official History, an “American air commander” prevented B Company of 3 RAR from landing at K Pad at Coral as planned. Yet, the reconnaissance parties of 12 Fd Regt and 1 RAR which were scheduled to land at K Pad (Map Reference XT9252840) just five minutes later did so without any problems. On arrival the reconnaissance parties (of which the author was a member) were met by US troops, not members of B Company 3 RAR. Contrary to this reality the Official History states that B Company 3 RAR on landing at an LZ some 1,000 metres to the South West “hurried” to the original landing zone which could only have been K Pad. If so they were not sighted by the reconnaissance parties or 161 Battery.
All was confusion on the LZ. The helicopters containing the Gunner and 1 RAR reconnaissance parties landed at 0720 hours into an area secured by a company from the US Army 1st Division (the Big Red 1) with airstrikes being conducted to the West. The 102 Battery Gun Position Officer (GPO), Lieutenant Ian Ahearn (the author), together with a Gun Section Commander, 2nd Lieutenant Bob Lowry and a Gunner Surveyor, Gunner Geoff Dwyer, had travelled with the 161 Battery party. Adding to the growing confusion, the Regimental Reconnaissance party, which included the 2IC of 12 Fd Regt, on landing, disappeared from the LZ and, at first, could not be contacted by radio. The only clue to the whereabouts of the party was provided by an American infantryman when he advised that “some guys had left the perimeter” and headed out into “Indian country”.
The Gunners in the reconnaissance parties expected that the procedures for a regimental deployment would be followed. That is the 2IC of the Regiment, Major Brian Murtagh, would indicate areas for each of the three gun batteries (including the US Battery that was to deploy the next day). Normally, the total area would be approximately 400 metres square. Each of the GPOs would then lay out their gun positions in their assigned areas. But the disappearance from the LZ of the Regimental Reconnaissance Party and the inability to establish radio communications prevented an orderly deployment of the artillery from the very outset.
Growing confusion was suddenly compounded by the unexpected arrival of 161 Battery’s guns. The sky above the LZ quickly filled with Chinook helicopters carrying the guns of 161 Battery, but with the absence of the 2IC there was no designated area in which to land the guns. There were also no gun tractors on the ground, so once the guns were landed, an action that the helicopters wanted to complete immediately, the only way to move the guns was by manpower. Apart from the intense problem that now existed on the ground, the arrival of these guns was the first sign that there was disruption to the planned air insertion. According to the plan, 161 Battery guns were not due until 1000 hours. The New Zealanders had no choice but to accept their guns and Lieutenant Rod Baldwin, 161 Battery’s GPO, sprinted away to lay out the gun markers.
Despite repeated efforts by both 161 Battery and 102 Battery, the 2IC could not be contacted by radio until the time when the helicopters began to land the 161 Battery guns. With communications being finally established, the 2IC acknowledged the pressing situation and ordered that the 102 GPO Party move to his location “just up the track”.[5] Such an obscure order was not at all helpful. The 2IC, whose actual location was still unknown, provided no map reference. The area had formerly been a rubber plantation and, naturally, it was littered with tracks. It was impossible to know what track the 2IC was referring to. The author therefore requested the 2IC to throw a smoke grenade to provide a visual indication of his location.[6] The author then took a compass bearing on the smoke and he and his two companions marched out of the LZ now in a state of frantic activity with the deployment of the New Zealand guns.
In his book, The Battle of Coral, Lex McAuley described the actions of Murtagh’s party once they had arrived at K Pad:
The recce party checked the location and found that they were 1000m away from the desired location, so they set off in that direction.[7]
This comment seems to explain why Murtagh’s party had disappeared from the LZ and moved off into surrounding country. It is not clear which member of the “recce party checked the location” but whoever it was could not map read. Apart from the confusion caused by the absence of the 2IC from the LZ at a critical time, this error in basic navigation was to have an impact on the subsequent operations around Coral.
The Official History failed to understand what transpired during the initial landing at the prescribed LZ when it declared that “the guns (161 Battery) were landed in an improvised landing zone, a clearing some 1,000 metres to the southwest of FSB Coral.”[8] That statement is wrong; as explained above, 161 Battery guns were landed at the only map location given in the orders. The location was subsequently verified by a report at 1045 hours that 161 Battery, despite the frantic confusion, had expeditiously established the battery on the ground and was ready for action at map grid reference 927284.[9] This grid reference specified a position just 200m from the LZ designated in the orders. On this basis alone, it is indisputable that 161 Battery was delivered to the right location and the Regimental Gun Position should have been grouped around that location.
Things did not turn out so well for the Australian battery. Murtagh selected a site for 102 Battery that was simply too far from the initial LZ. The only explanation for Murtagh’s decision to site 102 Battery so far from the initial LZ was poor map reading and a mistaken appreciation of how much real estate was needed to accommodate the future tenants of Coral. When the author’s party eventually found Murtagh, he was some 1500 metres from the LZ area. Deeply concerned, the author pointed out the enormous gap between the battery locations but Murtagh was unmoved and replied that as the Task Force was deploying, the space would be needed.
To determine an accurate location of the area, Ahearn, Lowry and the Battery Surveyor moved off into the rubber to a set of ruins that appeared on the map; this meant that the ruins could be given a grid reference. Using a theodolite the three moved back to the position, which Murtagh had indicated, to provide an accurate map location for the guns. As they moved through the rubber, they came upon an area with a hundred freshly dug circular weapons pits and picked up an AK -47 round and a lolly with a Ho Chi Minh wrapping. These were obvious signs that an enemy force had rested in the area within the last day or so. This vital and disturbing information was reported to Murtagh, but it appears that he told no one.
At this stage of the initial deployment it was now apparent that 1 RAR was not to land as planned since the supporting US helicopters had been temporally withdrawn resulting in a delayed fly-in. The withdrawal of helicopter support affected the orderly arrival of 102 Battery’s guns which began to be flown in at 1230 hours, before 1 RAR. Some of the battery sorties were delayed till later in the day. D Company 3 RAR, the company designated to defend the FSPB, indicated that it arrived at Coral (although timings are confused). According to Lex McAuley, the Officer Commanding (OC) discussed the situation with Murtagh and “came to some arrangement”. The OC of D Company explained that:
There was a gap between the rubber trees; we’d move our company up and sit there where we could get good views over the open ground on either side of the rubber. Now whether that was where we were intended to go or not, I’m not sure, but that was agreed with Brian Murtagh on the ground and we duly went off and dug in there.[10]
The precise location of D Company 3 RAR was never advised to 102 Battery or the 1 RAR Mortar Platoon when the latter finally arrived at Coral. D Company 3 RAR was to take no further part in the activities of the first night at Coral. The vagueness of the “arrangements” arrived at by Murtagh and the OC indicated the beginnings of the muddled planning and preparation for the defence of Coral. The alarming feature of what was unfolding was that Murtagh had been told about the close proximity of freshly dug enemy weapon pits, had seen the nervous Americans at the landing zone and had seen the airstrikes to the west. Such information should have had a significant impact on the officer who had been charged with the responsibility of local defence commander of the FSPB.
The Official History obliquely comments on the poor planning for the defence of Coral:
Major Brian Murtagh, second-in-command of 12 Fd Regt and commanding the artillery tactical headquarters, was the designated commander of the fire support base; he was faced with the difficult and complicated problem of coordinating the defence of FSB Coral with his two batteries of guns some 1500 metres apart instead of being located at Coral and two battalions in his general area.[11]
This comment needs to be considered in detail. Murtagh was not “commanding the artillery tactical headquarters”, he was commanding 12 Fd Regiment Regimental Headquarters.
The appointment of a FSPB defence commander was common standard practice and had been followed in all deployments previous to Coral. The procedures and practices of coordinating FSPB defence were therefore well known by infantry company commanders and gun batteries. Up to this point in time, Murtagh had no real experience of being an FSPB defence commander. In addition to his lack of experience – and probably because of it – Murtagh had complicated the FSPB defence problem by his own poor decision to site the two batteries 1,500 metres apart. While the Official History portrays Murtagh as being “faced with the difficult and complicated problem of coordinating the defence of FSB Coral”, the history fails to say that it was Murtagh’s own decisions that created the major problem of the dispersal of the two batteries. Furthermore, the presence of the two infantry battalions “in his general area” was not a problem as the Official History suggests. The presence of two battalions was a temporary and common practice and each only transited through “his general area” into their own operational areas. Indeed, the two infantry battalions were irrelevant to Murtagh’s role as defence commander of the FSPB because those units were not integral elements of the FSPB itself. The battalions would have no effect on his duties as the defence commander.
The infantry company allocated to FSPB defence, D Company 3 RAR, was not given clear orders by Murtagh nor, subsequently, were the other tenants of Coral under his command. It would seem that Murtagh himself contributed a great deal to the “difficult and complicated problem of coordinating the defence”. Bob Lowry accurately described the end result of the deployment with a concise comment on the defence problem:
The fire support base was under command of Murtagh for local defence, but was actually two separate bases, one clustered around 102 Battery and the other around 161 Battery, with the reconnaissance party of Headquarters 1 ATF and its Defence and Employment Platoon stranded between them. To compound matters, except for 10 Platoon located with 161 Battery, the remainder of D Company, 3RAR, was too far away to assist in the local defence of either base.[12]
From the tactical perspective, the layout of the military force was quite unsound. In view of indications of the presence of a disciplined military force the poor tactical stance was inviting trouble.
With the return of the US helicopters at the end of their temporary withdrawal, the disjointed fly-in recommenced and the infantry companies of 1 RAR began to flow through the 102 Battery area. It was obvious that they were confused and disoriented; most sent their affiliated artillery Forward Observers to 102 Battery to check on the map location before moving out to their night ambush positions. Second Lieutenant Gordon Alexander was sent on such a task by his OC, Major Tony Hammett.
At the gun position, Alexander spoke to Ian Ahearn, the Gun Position Officer (GPO), and one of the Section Commanders, Bob Lowry. They told him of the newly dug positions in the rubber trees just north of the guns, and that they thought there was ’something funny going on’.[13]
The gunners of 102 Battery were unable to carry out the normal defensive tasks such as the erection of barbed wire and the bunding of guns since neither the defence stores nor the battery bulldozer had arrived. They were set to work digging their personal weapon pits to stage 1 (1.5 metres deep), a task that none enjoyed but an effort that saved lives later on. The Official History states that:
Most 102 Battery soldiers had no time to dig their individual ‘shell scrapes’ deeper than fifteen centimetres before they had to stand to.[14]
The statement gives a false impression and appears to be based on the recollections of Lance Bombardier Forsdike who was a member of HQ Battery 12 Fd Regt, not 102 Battery. As indicated above, most of 102 Battery had dug to Stage 1 (1.5 metres deep) although some individuals may have only constructed shell scrapes. Unfortunately for the CP staff they also had to dig and then set up the CP since the bulldozer had not arrived. A trench about two meters deep was dug then “shelves” levelled out on each side to provide space for the CP staff (Duty Officer, two Operator Command Post Field and a Signaller. Sandbags were placed around the edges, wooden beams laid over them to form a protective cover and the peak of an 11×11 CP tent placed on top of the beams. Radios, connected to an R 292 mast aerial were set up outside the CP against the sandbags and the handsets passed through into the CP.
As the fly-in was coming to an end, a detachment of 131 Divisional Locating Battery comprising two listing posts (LP) and a mortar locating radar was airlifted in among the last sorties. LP 31C was deployed near the machine gun in front of No 4 gun and the radar was positioned between the 102 and the Regimental CP on the western side of the gun position. LP 31E moved on foot over the 1500 metres to the 161 Battery position.
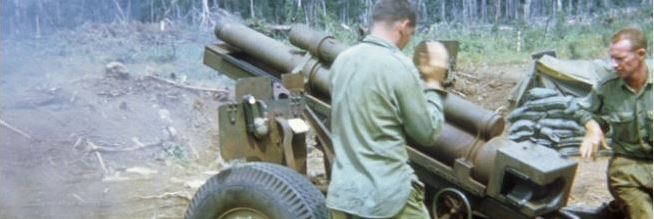
The 102 Battery helicopter sorties to Coral were complete by 1720 hours and they included additional ammunition, part of the battery defence stores and an O-sized bulldozer. The latter was quickly put to work piling up protective earth bunds around individual guns. The 1 RAR Mortar Platoon was among the last to arrive on the ground with last light fast approaching. The Mortar platoon was located at the left (northern) flank of the gun line some 50 metres from the nearest guns and like the guns it had a centre of arc of 1600 mils (due east).
One of the guns of 102 Battery showing bunding around the gun.
The Mortar Platoon was not isolated on the perimeter as claimed in different accounts of Coral; in a further display of the poor defensive layout the Mortar Platoon, 12 Fd Regt HQ and 102 Battery actually formed the perimeter! Misleadingly, the Official History incorrectly presents a picture of a totally isolated mortar platoon[15] when in fact the mortars formed what could be regarded as a seventh gun platform in 102 Battery located on the left – northern – flank of the gun position (when viewing the gun position in relation to the easterly centre of arc).
It was at this stage that CO 1 RAR decided that his HQ would not move out to join one of his companies as planned but would remain in Coral protected by his battalion’s Assault Pioneer and Anti-Tank Platoons. The battalion headquarters and the two platoons were the closest infantry to the mortars and 102 Battery, being some 400 metres south-east of the former and about 300 metres from the latter.
The poor defensive layout was only one aspect of the defence problem. As Lieutenant Tony Jensen, the Mortar Line Officer at Coral observed:
1 RAR mortars did not arrive on the position until approximately 1700 hours and there was no FSPB defence coordinating conference.[16]
Remarkably, there were no orders issued to any elements on the ground for the defence of Coral on that first night, including 161 Battery isolated some 1500 metres to the south-west. The New Zealanders were left out on their own, a situation that was also noted in the Official History.
As local defence commander, Murtagh was also responsible for coordinating 161 Battery defence and tying it in to the overall defence plan; the problem was that no plan existed and that the positioning of the two batteries had made the defensive task impossible. The defence principle of mutual support had been ignored.
At the 102 Battery position Jensen and Ahearn sited the two Battery machine guns, which were placed in front of Number 4 Gun and Number 6 Gun, and coordinated their arcs of fire with the Mortar Platoon machine gun. In addition Jensen tied in the arc of the Regimental CP machine gun with the latter. No coordination was carried out with any of the HQ elements of 1 RAR nor was any orders group held by the FSPB Defence Commander.
The Official History recorded that the 1 RAR Anti-tank Platoon’s two 90mm Recoilless Rifles (RCL) were sited to fire across the front of Jensen’s mortars.[17] This comment reinforces the impression that the mortars were in a totally isolated position; 102 Battery was between the Mortar line and the RCLs and the Mortar Platoon was shielded by the guns. The RCL could only be sited across the front of the 102 Battery gun position. In any case, no one informed Ahearn or Jensen that such a significant action had been taken.
A telephone line was run between the Mortar CP, 102 CP and the Regimental CP. The line was not extended to HQ 1 RAR. No defensive wire barriers were constructed since the wire had finally arrived on the position late in the day and erection of barriers could not be completed by last light. Furthermore, no claymores mines were deployed since the location of D Company 3 RAR was not known as darkness fell. The claymore mine was a powerful local defence weapon that, something like a large shotgun, simultaneously fired about 700 steel balls over a 60 degree arc, parallel to the ground. A command detonated weapon, the mine could have a devastating effect on enemy forces attacking a position. On a more positive note, the O-size bulldozer completed the protective earth bunds around guns 4, 5 and 6 before last light.
With the dark came ‘stand to’, the practice whereby all work ceased and all were required to ‘watch their front’ and maintain quiet in anticipation of an enemy assault. ‘Stand to’ was also implemented each morning at first light. It was essentially an infantry practice that was, at times, inappropriate in a gun position. The first night at Coral was one of those times as, what would normally be a period of attentive quiet, the last light ‘stand to’ was shattered by 105 mm Howitzers adjusting Defensive Fire for the companies from the two infantry battalions which were still deploying. Indeed, the need to stop defensive work for a full stand-to under these circumstances was highly questionable and resulted in only the northern guns (4, 5 and 6) being bunded before the bulldozer was obliged to stop. The bunding around the 4, 5 and 6 guns was to prove another stroke of luck. The map below shows the locations of the elements in and around Coral at last light on 12 May 1968.
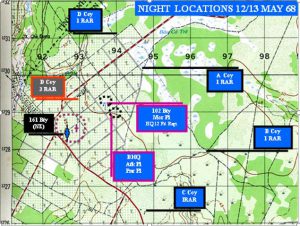
Map 1: Night locations 12/13 May 1968
Note: The purple circular area shows the area to be occupied taken from Annex A to Frag O No 6 to OpO 19/68. The purple cross is the location given for K Pad which, although intended as the B Company 3 RAR LZ, was not used by them. However, K Pad was used as the LZ for the reconnaissance parties. Note that the 102 Battery position lies 1000 metres outside the original area.
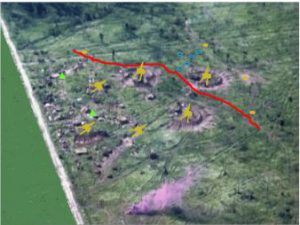
The photograph of the 102 Battery position below has been rendered from a photograph taken by then Gunner Ross Alexander on the 13 May 1968. It shows the gun and mortar position as it was at last light on 12 May 1968.
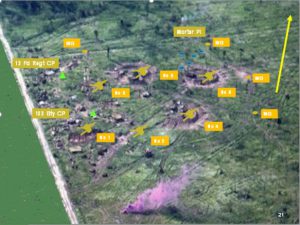
Aerial photograph showing state of 102 Fd Battery and Mortars as of last light 12 May.
Note: 1 RAR HQ is located to the south-east. The purple smoke is the site of the 102 Battery LZ. The bunding of the guns is incomplete with only 4, 5 and 6 guns protected. The proximity of the Mortars (blue circles) to the guns can be clearly seen. The area to the left has been “blanked” as it contained elements not present on 12 May.
The Enemy Responds
Unbeknown to the Australians and New Zealanders, the deployment of 1 ATF into Coral had been watched by elements of 7th North Vietnamese Army Division (7 NVA Div) and the enemy commander quickly decided to respond to this incursion. One battalion of 141 NVA Regiment augmented by 275 and 269 Infiltration Groups was tasked to attack Coral that night. It was a bold move that, along with surprise, would take advantage of the nascent state of the local defence preparations at Coral.
The NVA converged on Coral marching through the early hours of darkness and ultimately digging in a forming up place for the attack only 250 metres from the guns and mortars. The deployed infantry companies of 1 RAR detected the approach of the enemy to the FSPB. D Company 1 RAR reported a sighting of enemy at 1809 hours; a contact resulted with one North Vietnamese killed and one Australian wounded. At 1936 hours B Company 1 RAR fired at a party of enemy without any result. A Company 1 RAR reported the firing of two red flares which were acknowledged by two others and D Company 1 RAR reported green tracer being fired vertically into the air from different locations. These tracers were also noted by the sentries at the 102 Battery gun position. Green tracer was a certain sign of enemy forces since the allies only used red tracer.
At about midnight the Mortar Platoon machine gun opened fire on three enemy soldiers who were sighted at the edge of the Mortar position. Stand to was ordered during which an enemy machine gun returned fire which caused the Regimental CP to accuse Jensen of firing at them; Jensen replied that he only had red tracer and that the incoming tracer was green! No further incidents occurred and ‘stand down’ sent most of the gunners and mortar men back to bed as the machine gun sentries resumed their vigil.
At approximately 0215 hours the machine gunner of 12 Platoon, D Company 1 RAR, deployed in an ambush some 2,000 metres north of 102 Battery, opened fire on a group of the enemy moving southwest towards Coral. Retaliation by the enemy was swift and deadly as a salvo of Rocket Propelled Grenades (RPG) exploded in the trees above 12 Platoon and in a blink of an eye eleven of the platoon became casualties. The 102 Battery Forward Observer with the company, Gordon Alexander, quickly called in a fire mission and the tranquillity at the 102 Battery position was broken as “Contact! Contact! Fire Mission Battery” roared out over the tannoy system. The gunners tumbled out of their weapon pits and wrestled the six 2.2 tonne howitzers around to the north and began delivering their deadly 105mm projectiles in support of the infantry company. “End of Mission” was received some twenty minutes later and the details of the final target recorded as a Defensive Fire task.
Bob Lowry had fired the mission but the Battery Commander, Major Gavin Andrews, probably reflecting the concern of the 1 RAR commander, asked for the GPO and Ahearn was called to the CP. Andrews was obviously worried about the activity around D Company 1 RAR, probably reflecting Bennett’s concern, and asked if the battery could handle two Final Preventative Fire (FPF) tasks. Such a task involved guns being laid and loaded on the most likely target so that they could be fired immediately. It was agreed the battery would have two FPF tasks, one using 1, 2 and 3 guns laid to the east (B Company 1 RAR) and one using 4, 5 and 6 guns laid to the north (D Company 1 RAR) – a decision that would prove the value of luck in battle. It also led to positions later being described as “in front of the guns”. The new orientation of 4,5 and 6 guns placed the mortar line and the Regimental CP in front of those three guns while the eastern orientation of 1, 2 and 3 guns left both entities on the left flank.
The gun detachments cleaned up the residue from the fire mission around their gun platforms and most returned to their personal pits; the detachment on No 4 gun stayed up, preferring a coffee and cigarette to sleep. This action would also have a bearing on the events that were to follow.
At about 0230 hours the Mortar Platoon position and 102 Battery were engulfed in a hailstorm of RPGs, mortars and machine gun fire. Manning the machine gun in front of No 6 gun Gunners Mick Grimes and John Schwartze could not believe their eyes as RPG and machine gun fire flashed over their heads into the battery position. Grimes recalled:
Johnny and I saw no more than 150 metres out massed ranks of (enemy) infantry just stood up and came forward.[18]
They began engaging the NVA with their machine gun but the weapon jammed on three occasions and they fell back to their gun platform. The enemy followed up onto the top of the protective bund where desperate fighting took place. Grimes was “stitched up” by an NVA with an AK47 rifle, and was wounded in the hand but saved from the full effects by his Self Loading Rifle (SLR) which took the full brunt of the burst. Second Lieutenant Matt Cleland, Section Commander, arrived at No 6, emptied his pistol at the NVA then sprinted to his pit to retrieve his F1 Sub Machine gun. In the confusion the Australians dropped the M60 machine gun which had been brought in from the sentry pit. The NVA were now hurling grenades, and the Gun Sergeant, Max Franklin, ordered his detachment to fall back to No 5 gun. The Australian Gunners had no grenades to use against the NVA as they could only be released with the approval of the regimental CO or 2IC (a consequence of an Australian officer being killed by a grenade at FSB Bravo near Ap Ong Trinh Dc[19]). Franklin took the howitzer’s firing pin with him; a wise precaution but one that he failed to tell any of his officers about.
At the same time 2000m north, D Company 1 RAR had just completed a dangerous medical evacuation of their wounded via two lifts from US helicopters, and were observing a very large stream of enemy moving south towards the Coral position. The Forward Observer, Gordon Alexander, called for a fire mission: “One four, fire mission battery”. The reply from GPO Ahearn was, “This call sign under ground assault” to which Alexander could only reply, “oh!”
On No 4 gun the detachment, being the only gunners that had not returned to bed, quickly retrieved their personal weapons and as their machine gunner forward of the gun came scrambling back, opened withering small arms fire on the enemy assault. The gun was one of the three that had been bunded hence the detachment was protected and the barrel was pointing north straight into the axis of the enemy attack; the NVA were assaulting into the mouth of a 105mm cannon. Ahearn was asleep in his weapon pit and was woken by the barrage. He raced to the CP just as Sergeant John Stephens (Gun Sergeant No 4) reported on the tannoy that he had opened fire on an assault to his front and that he was running out of small arms ammunition and requested resupply. To complete his report, Stephens requested permission to open fire over open sights, a last resort for guns under attack from close quarters.
Each gun was equipped with six Splintex anti-personnel rounds for use in a situation just like this. Each Splintex round contained 7,200 flechettes – fin stabilized projectiles similar to small arrows. The only problem was that the battery had never fired the round before this. Lowry and Ahearn turned to the technical instructions but could find no reference to the correlation between the time fuse setting and range. They decided on a setting of 0.05 seconds and as Lowry passed the order to No 4 gun and Ahearn ducked outside the CP to monitor the effect. The projectile was fitted with a tracer base and Ahearn watched in dismay as the two rounds fired appeared to malfunction as they disappeared into the night. As it transpired these rounds were later found to have exploded over the NVA reserves some 400 metres out from the perimeter. The fuse setting obviously needed adjustment so Lowry ordered the fuse to be set to ‘muzzle action’ and the results visited awful damage on the assaulting NVA.
Ahearn decided to leave Lowry in the CP and to set off around the gun position to see what was happening. The stressful situation produced unexpected reactions and Lex McCauley recorded in his book: Lowry was “illogically” concerned “because Ahearn was not wearing a shirt, so took his own off and gave it to him”.[20]
At the CP entrance Ahearn met the Battery Guide, Warrant Officer Class 2 Les Wheeler, and briefed him to assemble an ammunition party and get a small arms resupply to No 4 gun. Leaving Wheeler to organise the resupply, Ahearn moved around the gun position to check on each of the gun detachments and their guns. The first thing that he discovered was that due to the earth bunding raised around the three northern guns the incoming NVA fire was high and therefore movement around the position was feasible.
Ahearn found that all gun detachments were either standing to around their guns or, in the case of No 4 gun continuing to fire over open sights. The detachments of No 5 and No 6 guns were manning the edge of No 5 gun’s bund and observing No 6 gun, which alarmingly was now in enemy hands. Ahearn instructed that No5 gun was to be loaded with Splintex and laid on No 6. At the first sign that the NVA were trying to move or turn the gun, No 5 gun was to engage; Ahearn did not know that Franklin had No 6 gun’s firing pin safe in his pocket making it impossible for the enemy to use the gun.
Returning to the CP Ahearn again met with Wheeler who had arranged the delivery of small arms ammunition resupply to No 4 gun detachment and he suggested that additional Splintex should be provided to that gun. It was agreed that all guns except No 5 would give up four of their six rounds and that additional high explosive – HE – rounds be moved up to No 4 gun.
At the Mortar Line Jensen and his men were also under attack:
The first warning of the attack came from Corporal Hickey, a section second-in-command (later killed in action), who alerted the Platoon second-in–command as the mortar attack began, and stated he was one of the picquets and there were about 400 enemy 50 metres away and gibbering. This information was immediately passed to 1 RAR CP on the Battalion command net, and on the internal defence net to FSPB defence CP.[21]
The mortar platoon was over-run and immediately Jensen called for fire from 161 Battery and the 3 RAR mortars located with them. Jensen shouted to his Platoon telling them of the incoming rounds warning them to stay in their pits. He advised both the local defence CP and HQ 1 RAR of his situation but the latter needed three reports before they understood what was happening at the Mortar Platoon. The men of the platoon took refuge in their shell scrapes. Arriving last on the position at last light the men of the Mortar platoon had not had sufficient time to fully develop their individual weapon pits. From their shell scrapes, the men of the mortar platoon began to engage the NVA with their personal weapons.
Near the Regimental CP, Lance Bombardier Andy Forsdike (HQ Battery) who was in charge of the machine gun team, heard “loud rustling in the grass” and telephoned the Regimental CP to request permission to open fire. His request was denied since the Regimental “HQ was not sure what was going on”. Forsdike then saw the NVA stand up close to his team, then he recalled “everyone including the VC went to ground as a very heavy barrage of Mortar and Rocket fire came into the gun position.”[22]
The attack on the Mortar Platoon and 102 Battery was simultaneous, not “through the mortar platoon and then onto 102 Field Battery”[23], as described by Bennett, the CO of 1 RAR. Both Bennett, and the 1 RAR after action report which recorded the event, were wrong in this observation; had the attack come only through the mortars in the first instance as claimed, the gunners would have had more time to prepare and the immediate engagement of the NVA assault by No 4 gun would not have been possible.
Jensen and his men were trapped by the speed of the NVA assault, the main factor influencing Jensen’s decision to stay and fight. It would have been possible for the men of the Mortar Platoon to pull back into the guns (two mortar men did just that) but such a move would have required the mortars and ammunition to be left behind as well as opening the way into the flank of the gun position. Jensen thought the NVA appeared to be surprised when they hit the Mortar position; this view is supported by the effect of the fierce resistance which broke up the attack. There was also a lack of concerted effort by the NVA to carry a very valuable treasure trove of equipment away. It would appear that the Mortar Platoon had moved in after the NVA had conducted their reconnaissance for the attack and that their presence disrupted the NVA assault.
Down the track to the west of the Mortar Platoon Forsdike and his team were in all sorts of trouble.
Enemy swirled around Forsdike‘s men; the young bombardier’s M60 jammed. He wrestled with it. Two men fell to his rear: one dead one wounded.[24]
The savage fight around Forsdike’s machine gun was to leave two Australians dead and two more wounded.
The Mortar Platoon was also in trouble with the NVA “systematically firing at each pit, tent or sign of occupation.”[25] Casualties began to mount; Corporal Jock Witten was hit and Private Graham Stevens went to his aid but an RPG killed Whitton and wounded Stevens. The NVA had managed to seize an Australian mortar firing three rounds before Jensen’s men stopped their efforts with heavy small arms fire. Jensen was subjected to scrutiny by “a big bare-headed man in khaki, wearing a Vietnamese belt and a holstered pistol, hands behind his back, peering down at me. He just, strolled away but did not get far. I shot him.”[26]
Overhead the pitch dark sky lit up by the miniguns and rockets of Cobra helicopter gunships. The gunships had been called in by the Fire Support Coordination Centre (FSCC) at HQ 1 RAR. Major Gavin Andrews, 102 Battery Commander, was busy organising artillery support from any American artillery in range. In all, some nine batteries including 161 Battery, were dropping rounds onto the immediate surrounds of Coral. All was now bedlam within the 102 Battery position.
No 4 gun was still firing over open sights. It had expended twenty two rounds of Splintex and had switched to High Explosive (HE). The comment in the Official History attributed to Major Murtagh that the direct action fuses were set to “delay” and that “the guns were depressed to fire the shell at the ground some 40 to 50 metres in front of the gun [and] the round ricocheted and exploded in the air, close to the ground and over the heads of the enemy”[27] is sheer fantasy. The barrel was close to parallel to the ground with just enough elevation to clear the bund and the detachment too busy to set fuses to delay. In fact so intense was the pressure that they fired at least two unplugged rounds (returned by the infantry next day) and one illuminating round that created some excitement. In all No 4 gun fired eighty four rounds over open sights.
No 2 gun was hit by an RPG that blew out its tyres and punctured the trail. One of the detachment was slightly wounded. Lance Bombardier Geoff Grimish “was carrying a round to the (No 4 Gun) from his own position, and distinctly saw an NVA jump up onto the bund and aim an RPG, but ignored him, buoyed up with ‘a feeling of invincibility’, and a split second later the NVA was gone; he had been standing directly in front of the cannon (No 4 gun) as it fired.”[28]
An RPG round rocketed over the position and exploded in No 1 gun’s ammunition bay. The ammunition began to burn fiercely as the cordite in the cartridge cases caught fire. Sergeant Ray Dial the Gun Sergeant, tried to extinguish the flames but gave up and took his detachment a short distance along the road to the south, waited for the flames to die then returned to his gun.
Ammunition continued to be delivered to the forward guns and Bombardier Riley, the 102 Battery Transport NCO, drove the battery Landrover backwards and forwards despite the heavy enemy machine gun fire that the vehicle attracted. The O-sized bulldozer sat forlornly in the middle of the gun position riddled with bullets and shrapnel and leaking fuel.
Ahearn continued to move around the position, returning at intervals to the 102 Battery CP to brief both Bob Lowry and, by radio, Andrews at the 1 RAR CP. Andrews gave an overview of the artillery and air support that he was coordinating and advised that “Spooky” would shortly be on station.
Ahearn also reported to the Regimental CP but no orders or instructions were issued by the FSPB Defence Commander save one; an order to throw grenades at the machine gun in No 6 gun position that was causing the Regimental HQ some discomfort. Grenades and M79 rounds delivered from No 5 gun platform silenced the machine gun. The grenades had to be retrieved from the battery stores before they could be used.
Neither Ahearn nor Jensen received any other orders or instructions from Murtagh, the Local Defence Commander, during the night. In Jensen’s case receiving orders would have been difficult since his telephone connection with the Regimental Command Post had been severed. 102 Battery CP had telephone communications with the Regimental CP throughout the battle but with the exception of the order to throw grenades no instructions were issued.
Radio communications were becoming a problem. The battery radio used for the Regimental Radio Net had been hit and destroyed; one radio was on the Battery Radio Net linking the 102 Battery CP with the Battery Commander at 1 RAR HQ and the Forward Observers with the infantry companies. A third radio was on the 1 RAR Battalion Command Net allowing 102 Battery to listen to exchanges between the Mortar Platoon and HQ 1 RAR. Only two of the terminals, No 4 gun and No 5 gun, of the gun command tannoy system linking the howitzers to the 102 CP, were operating. The wire linking the system had been cut by incoming RPG and mortar rounds. The telephone line between the Regimental, 102 Battery and Mortar Platoon CPs was operative although the Mortars dropped off the line shortly after the assault began. At least two wounded gunners (Grimes and Nichols) were brought to the 102 Battery CP and placed on the rear shelf making life a little overcrowded.
“Spooky” made an appearance over the battle and announced his presence by lighting up the battle with enormous parachute-borne flares. “Spooky” or “Puff the Magic Dragon” was an AC-47 aircraft (the military version of the DC3) fitted with 2 or 3 GAU-2A 7.62mm miniguns (“Gatling” guns) capable of delivering 6,000 round per minute. The red tracer streaming down from the heavens was a sight that many of the Australian soldiers would remember for life. “Spooky” continued to circle ‘hosing’ the perimeter of the FSPB. Adding to the rain of tracer from “Spooky”, the helicopter gunships continued to make their runs up and down the northern flank.
The 102 Battery, Mortar Platoon and Regimental CP positions showing the extent of the NVA penetration. Note that the three guns at the right of the photograph are pointing north while the remaining three guns are pointing east.
At this stage the infantry companies out in their ambush position began to call for artillery support. Although enemy fire was still coming into the gun position guns 1, 2 and 3 began firing in support of them. Three section gun missions were fired during this period. Sergeant “Skeeter” Humphries No 2 gun detachment performed extremely well since the gunners were required to manhandle its 2.2 tonnes under fire, in the dark with both of the gun’s tires blown out.
The fight had been underway for more than two and a half hours and dawn was fast approaching. The situation in the Mortar platoon was getting worse. The gun position had tried to contact the mortars by voice but those attempts only resulted in increased machine gun fire. The 102 Battery CP could hear Jensen on the 1 RAR Command Net as he repeatedly called for Splintex to be fired across his position. The CO 1 RAR finally relented and agreed.
The Official History version of what happened next is pure fiction based on a misinterpretation of the military terms “call for” and “directed” and a misreading of those terms in an interview with Jensen. The Official History version deserves stating in full to reveal just how wrong it is. It states:
In desperation Jensen saw the only option open to him was to direct the fire of the 90 mm RCLs onto his own position. He had been providing very clear reports of the situation and Bennett had no compunction into agreeing to the fire missions. Several times Jensen called for such fire. Bennett regarded this as the second critical period in the battle, when the enemy had actually achieved a break-in.
‘Stay down’, Jensen shouted to his platoon each time through the din, ‘Splintex coming in’. He would then immediately call for fire, and the bangs quickly followed.[29]
Certainly, Jensen had been providing very clear reports to Bennett while persistently calling for Splintex fire across his position but Bennett was reluctant to approve what appeared to be a drastic solution. 102 Battery CP listened to the discussions on the 1 RAR Command Net and Jensen made several transmissions ‘calling for’ Splintex to be fired over his position. These calls were not fire missions as the Official History recorded; they were repeated requests to take a course of action. Furthermore, Jensen was not considering the fire from the 90 mm RCLs which belonged to the Anti-tank Platoon. Jensen wanted Splintex fire from the 105mm guns of 102 Battery. So, while quoting Jensen, the authors of the Official History misconstrued what Jensen was doing. There are a few considerations that highlight this misconstruction. An examination of the layout of the FSPB by the Official History authors would have revealed that it was physically impossible for the RCL of the Anti-tank Platoon to fire over the Mortar Line as the latter was screened from the former by 102 Battery guns. From his perspective on the ground in the Mortar platoon position, it was abundantly obvious to Jensen that it was only the guns of 102 Battery which could help relieve the desperate situation his platoon was in. The use of the RCLs never entered his mind and, furthermore, the RCLs were at the outer limit of their Splintex range (300 metres).
Another factor was that the RCLs only had eight rounds of ammunition for each of the two weapons to begin with and had they been firing for two hours at “opportunity targets” as indicated by Second Lieutenant Les Tranter.[30] They would not have had the ammunition to fire multiple fire Splintex missions near the end of the action. In short the version of the firing of Splintex over the Mortar Platoon in the Official History is pure invention.
These considerations and conclusions are supported by Jensen in his article in Infantry in 1973. Remarkably, Jensen’s article was known to the authors of the Official History because it was quoted as a source in other areas in the Official History. In his article, Jensen recorded:
At this stage the mortar position was engaged with splintex by 102 Field Battery. The accuracy of their fire was revealed after the contact. Some enemy had attempted to drag away a complete mortar (which they couldn’t dismantle) and their bodies and the mortar were found about five metres from the mortar pit. Several splintex darts had penetrated the barrel and also about 20% of the ammunition on the mortar line.[31]
The authors of the Official History might also have researched the 1 RAR After Action Report which recorded at 0425 hours 13 May 1968:
Gunners from 102 Fd Bty were able to engage en with HE and splintex rounds and fired over the Mor Pl position.[32]
Ahearn also described the incident in his report on the attacks on 102 Battery:
At approximately 0500 hrs a request was made by the mortar position to fire splintex across their position. No 5 gun fired 5 rounds across the mortars which proved very effective.[33]
Yet another description of the event was recorded by Lex McAuley:
For a long time there had been no contact between the mortars and the guns, but at last Tony Jensen acknowledged the call from Ian Ahearn, who had gone to No 5 gun pit in an effort to determine what had happened to the infantry mortar platoon and it was arranged that splintex would be fired across the mortar position. He called for his men to get down and the lethal hail from 5 rounds slashed overhead.[34]
In short the Splintex fired over the Mortar Platoon was fired by No 5 gun 102 Field Battery and it was one fire mission comprising five rounds. The Official History account is totally wrong and the authors failed to refer to readily available sources to cross reference their version of events. Both Jensen and Ahearn met with Ekins, one of the Official History authors, after the publication of the Official History and pointed out the errors regarding the firing of Splintex over the mortars but Ekins declined to accept their eye witness account.
Close–quarters fighting
The Official History state that “on reaching the artillery position, the North Vietnamese overran two guns and desperate fighting at close quarters occurred between the gun emplacements.”[35] This description in the Official History is wrong. At no stage were two guns over-run; No 6 gun was the only gun over-run. By using the phrase “on reaching” the Official History gives the false impression that the fighting was over in the Mortar Platoon and had now switched to the gun position. The assaults on both the Mortar Platoon and the gun position were simultaneous as was the fighting. The retaking of No 6 gun did not occur until almost first light and the events have been described above. First light (dawn) occurred at 0510 hours (5.10 a.m.) not as reported in the Official History at “5.45 a.m.”[36]
The NVA began to withdraw and by first light artillery and the gunship helicopters were engaging their withdrawal routes as they fled to the north, north east and south west. In the 102 Battery positions two groups had been assembled. One was to assault No 6 gun and re-take it from the enemy, then to move out to clear the area in front of the gun and mortar positions. The other group was to be prepared to move into the Mortar Position to provide aid. As first light came these patrols did just that.
The first patrol swept through No 6 gun around the front of the mortars and around to the rear of the Regimental CP. “Greg Ayson, a member of Max Franklin’s No 6 gun, and a member of the clearing patrol, was later surprised to realise that ‘all the training at Canungra, [the Australian jungle training centre] all the rigmarole you go through came out then. Out we went, no hesitation about it and we did a fairly good job of clearing the area.’”[37]
The patrol shot and killed one NVA soldier in their sweep. Meanwhile the second patrol moved out into the Mortar Line and found chaos. There were dead and wounded mortar men scattered throughout the position and the 102 Battery medic, Corporal Alistair “Doc” McKenzie, began treating the wounded immediately. One NVA wounded was carefully searched and given first aid, he had been wounded across the chest by a burst of what appeared to be 9mm rounds.
The Official History makes no mention of the 102 Battery patrols and mistakenly reports an ”enemy killed in the Number 6 emplacement at 6.10 a.m”[38] and gives the impression that only the 1 RAR Anti-tank Platoon conducted the first clearing patrol. The 1 RAR After Action Report is the source of the information about the NVA soldier killed in No 6 gun position but it is wrong since, by that stage, 102 Battery had reclaimed the gun. The presence of the 102 Battery patrols and the recapture of No 6 gun by the gunners is confirmed by Tony Jensen in his Infantry article.[39] The 102 Battery clearing patrol was withdrawn back into the gun position when HQ 1 RAR advised that they were mounting a patrol. 102 Battery personnel remained in No 6 gun and in the mortar position. The presence of a 3 RAR patrol which “carried out a sweep from the north to the south”[40] is not recalled by either Jensen or Ahearn. The HQ and D Company were the closest 3 RAR troops to the 102 Battery position and they were to the west not the north. Any patrol from the north would have to risk being mistaken for enemy by the helicopter gunships still operating in that direction and by the gunners in 102 Battery. The Official History does not provide a reference for this information.
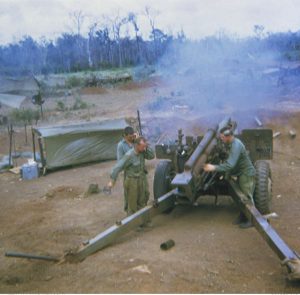
Gun crews standing to after the battle
As the Australians began to recover and count the cost it was revealed that nine Australians had been killed and twenty eight wounded. Jensen’s Mortar Line bore the brunt of the casualties with five dead and eight wounded out of eighteen men. Two Gunners were dead and four wounded. Fifty two NVA dead lay strewn around the guns and mortars and one NVA soldier was taken prisoner. Two of Jensen’s mortars were damaged and one 105 mm Howitzer was damaged beyond immediate repair and had to be flown out, another had both tyres blown out and a hole in its trail but the gun stayed in action. The 102 Battery O-sized bulldozer was riddled with small arms fire and also had to be back loaded. Every piece of canvas (used for ammunition bays) was shredded and all personal sleeping tents (‘Hoochies’) were riddled with bullet and shrapnel holes.
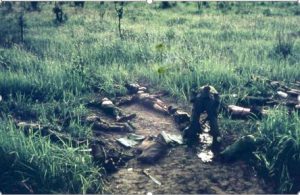
NVA dead in front of the 102 guns. Photograph by Greg Ayson, 102 Field Battery
The NVA began to withdraw shortly after first light and they were harassed by helicopter gunships and artillery. HQ 1 RAR issued orders for the scattered companies to concentrate on Coral. D Company on its way back into Coral struck a group of enemy and mounted a company attack. The company called for artillery fire ”and so created for Gavin Andrews, the commander of 102 Battery his most vivid memory of the entire operation, ‘the one I feel privileged to have. The answer for this battery target was, first two guns fired, then three, then five and then the badly damaged gun fired a couple of round and they were all firing’.”[41] Andrews was partly wrong; only five guns fired since No 6 was unable to fire but the emotion of the moment clearly stayed with him.
The mission was in support of D Company 1 RAR as it closed in on the FSPB and made contact with a group of NVA. Major Tony Hammett led his company in an assault, over open ground with fixed bayonets and 102 Battery’s “walking” artillery fire falling just 150m ahead. It was to prove inspirational to a company that had been badly hit during the previous night particularly as the assault succeeded in overrunning the enemy position without a single casualty.
Working parties from 102 Battery and the 1 RAR Anti-tank Platoon began to collect the Australian and NVA dead and wounded. This grisly task was still underway when the road conveys containing the remaining elements of 1 ATF arrived. An engineer bulldozer was used to dig a mass grave in front of the guns and the fifty two NVA dead were interred there. The Australian dead and wounded were evacuated by helicopter to the US hospital at Long Binh.
The gunners began to clean up their gun platforms. No 6 gun was severely damaged and was flown out dangling from a Chinook as was the battery bulldozer. A replacement gun, bulldozer and gun tyres for No 2 were air delivered later in the day. Defences were improved including deepening of personal weapon pits, the addition of overhead cover, the construction of machine gun bunkers within the bunds of each gun, wire defences and sandbagging the roof of the CP.
The gunners of 102 Battery had been in a savage and bloody fight and had survived almost unscathed, a result due largely to luck combined with a dogged will to win through. On the other hand the NVA commander had little luck. His reconnaissance elements had failed to detect the mortar position and his assault was dislocated by the resistance of the mortar men. His troops moving in on the FSPB struck D Company 1 RAR resulting in three guns being turned to point on his assault axis, the No 4 gun detachment had remained awake at their gun after a fire mission and quickly responded to the assault and the three northern guns had been bunded causing the NVA supporting fire to be high.
The final layout of Coral was determined by a failure to carry out proper artillery procedures for a regimental deployment, the disruptions in the planned helicopter move, poor map reading and a poor appreciation of the area needed for the units destined to occupy the FSPB. The final layout of Coral was impossible to defend with the allocated infantry company although better use of that company could have been made. The lack of FSPB defence coordination and orders from Murtagh, the Local Defence Commander, both before and during the attack is perplexing. The authors of the Official History shed little light on these critical aspects of the battle of FSPB Coral.
Although the FSPB defences were incomplete and the command and control arrangements for the FSPB almost non-existent, the initiative and determination of individual soldiers augmented by massive accurate and timely fire support prevented what could have been a disaster for the Australians.
History is unable to record the precise details of any event, particularly those of battle, since individuals recollections of actions, events and times differ markedly. Historians must however cross reference and not substitute personal interpretations of material for thorough research. The Official History of Australia’s Involvement in South East Asian Conflicts 1948-1975, On the Offensive, The Australian Army in Vietnam 1967-68 is in major error about the firing of Splintex over the 1 RAR Mortar Platoon at the culmination of the first Battle of Coral on 13 May 1968. The Official History needs to be corrected.
Postscript
The first attack on Coral heralded strenuous attempts by the NVA to clear the Australians from their route to and from Saigon. A second attack struck Coral on 16 May. A storm of mortars and rockets fell on 1 ATF HQ, 102 Battery, A Battery 2/35 and the Task Force Maintenance Area. Enemy mortar rounds blew out the tires on the hapless No 2 gun and scored a direct hit on the 102 Battery CP which survived the blast. Sergeant “Robbie” Robertson was wounded in the eye during the bombardment and was evacuated. A gunner from A Battery 2/35 Battalion US Artillery was killed. An estimated NVA Regiment struck A Company and D Company 1 RAR in turn. Massive US artillery and air support including strikes by fighter bombers using napalm was instrumental in defeating the NVA assault.
Although this was the last ground assault on Coral the enemy continued to mortar the FSPB on a regular basis. On 24 May the Australian Centurion tanks arrived in Coral and their presence was to prove a major advantage for the Australian’s struggle with the NVA.
On 24 May FSPB Balmoral was established north of Coral and occupied by 3 RAR and a troop of tanks. 161 Battery moved to Coral which was then able to provide 18 guns to support Balmoral. The NVA reacted violently to the Australian move and on 26 May at 0345 hours a preliminary bombardment preceded a battalion sized assault on Balmoral. Mortars and RPGs were used against Coral in an attempt to suppress supporting fire but the attempt failed. 102 Battery guns were soon hard at work providing supporting fire missions. Gunner San Carbines, an Operator Command Post Field in the 102 Battery CP recalled:
It wasn’t long before we had a second fire mission so we had three guns firing on the original target and three on the next. Then we had a call for another fire mission, this time for illumination. My first reaction was that we could not calculate three fire missions simultaneously, however, with suggestions from Trevor and the lieutenant, and quick manipulation of our equipment and with our high level of training we accomplished it without making errors. This was not textbook stuff. It was survival for the FSB and providing support to those who were in desperate need. For every adjustment to the firing the surveyors had to recalculate and the bearing and elevation of the guns altered. The radio messages kept coming for the three fire missions, adjust fire, add two hundred metres, fire, drop fifty metres, fire, five rounds fire for effect, fire, add two hundred metres ten rounds fire for effect, so on for hours and hours.[42]
Once again massive artillery and air support decimated the enemy who were also subjected to accurate tank fire. Later on the same day D Company 1 RAR and a troop of tanks became engaged for three hours in an enemy bunker system. Artillery and mortar fire provided a protective box around the infantry and armour allowing them to methodically destroy individual bunkers until deteriorating weather forced a withdrawal.
The action proved the effectiveness of tank/infantry assault on bunker systems as opposed to tackling such systems with infantry alone where the likelihood of casualties was high. Despite the scale of the bunker position and the tenacity of an enemy that refused to withdraw, the company and troop destroyed a large number of bunkers and NVA without suffering any casualties – not one scratch.
The second attack on Balmoral came early in the morning on 28 May. Once again there was a preliminary bombardment and once again Coral came under mortar and rocket attack. Once again the NVA were repulsed with heavy casualties. This attack was the last NVA attempt to overrun the Australian bases.
Tanks and infantry again combined on 30 May when C Company 1 RAR came under heavy fire some 3,000 metres east of Coral. The company had deployed with Armoured Personnel Carriers (APC) and after dismounting, found themselves in a bunker system occupied by aggressive NVA units. The company called for tanks and two Centurions and a troop of APCs linked up with the Company and the tanks began to systematically destroy the bunkers. Artillery, mortars and airstrikes supported the action and continued as the Australians withdrew after nearly four hours.
This action proved to be the last major action for the Australians in Operation Toan Thang. Although there were minor contacts with the enemy over the next few days it was decided to withdraw 1 ATF on 6 June 1968. This brought to an end what should be regarded as the first brigade-sized operation involving all combat arms (infantry, artillery, tanks, cavalry, engineers and aviation) since World War II.
For their actions in Bien Hoa the Royal Australian Regiment, 1st Armoured Regiment and 3rd Cavalry Regiment were awarded the Battle Honour ‘Coral Balmoral’. 12th Field Regiment was not awarded a Battle Honour as artillery units consider the guns their colours; 102 Field Battery was awarded an Honour Title and is now known as 102 ‘Coral’ Battery.
BIBLIOGRAPHY
Books
Ham, Paul. Vietnam: The Australian War, Harper Collins, Sydney, NSW 2007.
Lowry, Robert, The Last Knight: A Biography of General Sir Phillip Bennett AC, KBE, DSO. Big Sky Publishing, Newport, NSW, 2011.
McAuley, Lex, The Battle of Coral: Fire Support Bases Coral and Balmoral May 1968, Hawthorn Hutchinson, 1988.
McNeil, Ian and Ekins, Ashley, The Official History of Australia’s Involvement in Southeast Asian Conflicts, On the Offensive-The Australian Army in Vietnam 1967-1968, Crows Nest, Allen & Unwin, 2003
Documents
1 ATF Fragmentary Order no 6 to Operation Order 19/68. Bearcat, Bien Hoa, South Vietnam, 10 May 1968.
Report on Attack on 102 Fd Bty Position 13 May 68 and 16 May 68. Lieutenant I. F. Ahearn , Gun Position Officer 102 Field Battery, Coral, South Vietnam 21 May 1968.
Execution Sequence of Events, Annex B, 1 RAR After Action Report 2/68, Operation Toan Thang, 30 June 1968.
Carbines, Stan (ex-Gunner 2785732 102 Field Battery 1968), Fire Support Base Coral: A Gunner’s Story, 19 September 2009.
Andrew Forsdike, Handwritten Letter on experiences at Coral, not dated.
General Sir Phillip Bennet, Coral Address to Commemoration, Townsville, 13 May 2006.
Interviews
Winston Hadley (Mick) Grimes, Interview by Ian Ahearn and Libby Stewart, AWM, 13 May 2008.
Jensen, Tony, 19 July 2012
Alexander, Gordon, 27-28 July 2012.
Journals
Jensen, A.H., “FSPB Coral”, Infantry, vol. XIX, no. 2, May-June 1973.
Murtagh, Brian, “Coral Twenty Eight Years On: Some Recollections of a Gunner”, Duty First, Vol. 2, no. 2 (New Series), March 1996.
Web Site
GAISMA.com. A website that provides sunrise, sunset, dusk and dawn times for thousands of locations all over the world.
Notes
[1] McNeil, Ian and Ekins, Ashley, The Official History of Australia’s Involvement in Southeast Asian Conflicts, On the Offensive-The Australian Army in Vietnam 1967-1968, Allen & Unwin, 2003, Crows Nest, p. 354.
[2] General Sir Phillip Bennet, Coral Address, May 2006.
[3] Lowry, Robert, The Last Knight: A Biography of General Sir Phillip Bennett AC, KBE, DSO, Big Sky Publishing, Newport, 2011, p. 104.
[4] McNeill & Ekins, On the Offensive, p. 358.
[5] Radio conversation between Ahearn and Murtagh, 12 May 1968
[6] A normal practice that involved the use of a coloured smoke grenade, the identification of the colour of the smoke by the observer and a confirmation by the smoke user.
[7] McAuley, Lex, The Battle of Coral, Hutchinson, Hawthorn, 1988, p. 34.
[8] McNeill & Ekins, On the Offensive, p. 360.
[9] 1ATF Commander’s Diary
[10] McAuley, The Battle of Coral, p. 36.
[11] McNeill & Ekins, On the Offensive, p. 360.
[12] Lowry, The Last Knight, p. 93.
[13] McAuley, The Battle of Coral, p. 41.
[14] McNeill & Ekins, On the Offensive, p. 363.
[15] Ibid, p. 362.
[16] Captain A. H. Jensen, ‘FSPB Coral’, Infantry, Vol. XIX, no 2, May-June 1973, p. 27.
[17] McNeill & Ekins, On the Offensive, p. 363.
[18] Winston Hadley (Mick) Grimes, Interview by Ian Ahearn and Libby Stewart, AWM, 13 May 2008.
[19] Lieutenant Brian Burse was killed on 10 December 1967 when an M26 grenade was thrown into his sleeping area by an unknown soldier.
[20] McAuley, The Battle of Coral, p. 71.
[21] Jensen, Infantry, p. 27.
[22] Lance Bombardier Andrew Forsdike, hand written undated notes on FSPB Coral, p. 3.
[23] McNeill & Ekins, On the Offensive, p. 366.
[24] Ham, Paul; Australia’s Vietnam War, Harper-Collins, Pymble, 2007, p. 371.
[25] McNeill & Ekins, On the Offensive, p. 81.
[26] McAuley, The Battle of Coral, p. 82.
[27] McNeill & Ekins, On the Offensive, p. 368-9.
[28] McAuley, The Battle of Coral, p. 77 (insertion in italics by the author).
[29] McNeill & Ekins, On the Offensive, p. 368.
[30] McAuley, The Battle of Coral, p. 80.
[31] Jensen, Infantry, p. 28.
[32] Annex B to 1 RAR After Action Report, 2/68.
[33] Lieutenant I.F. Ahearn, Report on Attack on 102 Fd Battery Position, 13 May 68 and 16 May 1968, p. 4.
[34] McAuley, p. 92.
[35] McNeil & Ekins, On the Offensive, p. 368.
[36] Ibid, p. 370
[37] McAuley, The Battle of Coral, p. 98.
[38] McNeil & Ekins, On the Offensive, p. 370.
[39] Jensen, Infantry, p. 28.
[40] McNeil & Ekins, On the Offensive, p. 370.
[41] McAuley, The Battle of Coral, p. 96.
[42] Carbines, Stan (ex-Gunner 2785732 102 Field battery 1968), Fire Support Base Coral: A Gunner’s Story, 19 September 2009, p. 7.